Included in this Guide:
1. Getting Started & Launching an Inspection
3. Tips for the Optimal Experience
🔑 Getting Started: Launching an Onsite Inspection
Follow these steps to begin your onsite inspection with IrisCX:
Step 1: Log In
-
Go to your dedicated IrisCX workspace and log in with your IrisCX account credentials or Single Sign-On (E.g Google, Facebook, Microsoft).
-
You’ll land on the Home tab once logged in.
Step 2: Create a New Session
-
Click the Create New Session button to start the process.

Step 3: Enable Onsite Mode
-
In the session creation window, toggle the Onsite switch ON at the top of the screen.

Step 4: Link or Create a Property
-
Select an existing property from the dropdown.
-
Tip: If your property isn’t listed:
-
Tap Manage Properties to create one immediately, OR
-
Skip this step and add the property later via the Properties tab after your inspection.
- Use the "Session ID" field to enter a work order or job code - any unique reference to help you search the session later.
-

Step 5: Launch the Session
-
Click Launch Session to proceed.
Step 6: Prepare to Join
-
After granting location access, you'll enter the prep screen.
-
Here, you can:
-
Adjust audio/video settings.
-
Toggle your camera on or off.
-
Note: Nothing is recording at this stage.
-
Step 7: Start the Inspection
-
When ready, click Start to begin the inspection and start recording.
🛠 In-Call Functionality: Tools for Efficient Inspections
Once your inspection has started, IrisCX provides a range of real-time tools to improve accuracy, documentation, and follow-up efficiency.
🔍 Zoom
-
Get a closer view with built-in zoom controls.
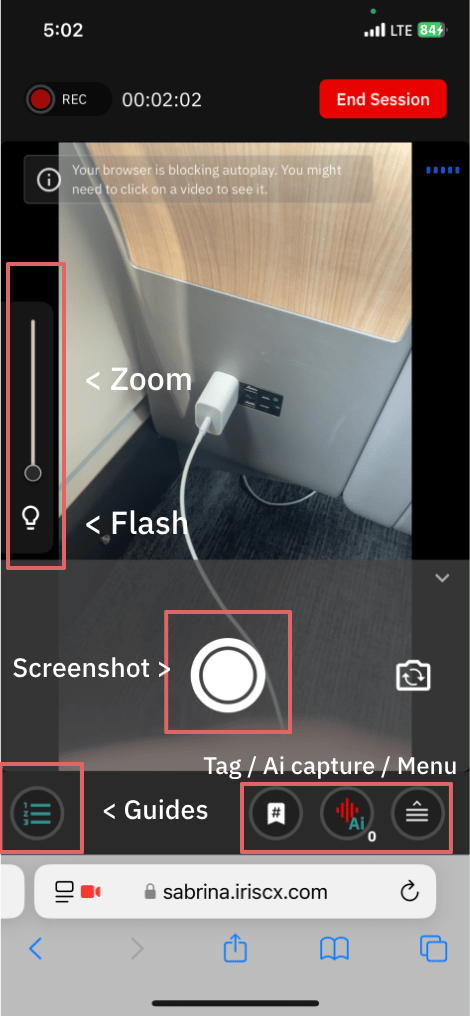
💡 Flash
-
Tap to enable your device’s flash feature.
📸 Screenshot
-
Capture important visuals mid-session.
-
Screenshots are automatically saved in your session’s record for future reference.
📘 Guides
-
Access embedded checklists and step-by-step guides to ensure your inspection meets standard procedures and quality expectations.
🔖 Tag
-
Tag critical moments during the call.
-
Tags make it easy to review key points post-inspection.
🤖 AI Task Button
-
Press the Ai button and say the action item to be captured & summarized post-call.
💡 Tips
Maximize your onsite inspection efficiency with these expert tips. From guide interaction to session organization, these best practices will help ensure thorough and streamlined inspections.
📘 Guide Tips
Make the most of your in-call Guides with these helpful tips:
✅ Mark Completion Easily
Tap the checkbox next to a guide item to mark it as complete. The completion status and timestamp are saved in IrisCX and can be accessed later during video review or reporting.

📸 Capture from Within a Guide
Tap the screenshot icon directly within a guide question to take a photo. It’s faster and keeps everything connected to the correct step.

🔖 Tag Important Steps
Use the tag icon inside the guide to bookmark important moments. This creates a powerful cross-reference between Tags and Guide steps, adding valuable context for future review.
