Table of Contents:
Introduction: What is the IrisCX Sendgrid Integration?
SendGrid integration is a powerful feature enabling you to own your communication experience by creating more personalized workspace emails.
- You can customize the copy and layout of your automated email templates to reflect your brand.
- Provide customers and team members with a more personalized and professional communication experience.
- Increase engagement and response rates by sending more visually appealing and relevant messages.
Getting Started:
Prerequisite: Before integrating your SendGrid account with your IrisCX Workspace, you must ensure an active SendGrid account. If you don't already have one, you can sign up for a Free account on their website.
For more information on setting up your Sendgrid account, check out this resource: Setting up your SendGrid account.
Connecting your Sendgrid Account to your Iris CX Workspace
Once you have an active SendGrid account, you can connect it to your IrisCX Workspace.
Here's how:
- Log in to your IrisCX Workspace account as an administrator.
- Navigate to the "Settings" tab in your navigation bar and select "Integrations" from the dropdown menu.
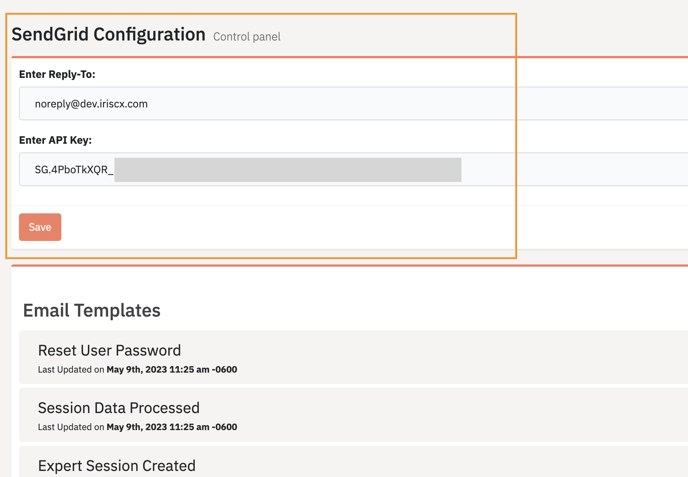
- Navigate to the "SendGrid" integration.
- Enter the whitelisted "Reply to" email address used in your SendGrid under "Sender Authentication" in the field provided
- In the secondary field, enter your SendGrid API key.
- Click "Save" to complete the integration.
Customizing Email Templates:
Email templates are pre-designed emails, confirmations, or other types of communication generated from actions in your workspace. These templates have default content that can be edited to match the tone and messaging of your brand.
Email Templates
When you integrate your SendGrid account with IrisCX Workspace, you can customize the following Built-In automated email templates:
| Email Template | Trigger |
| Session Playback Link | Sent to a user when sharing a playback link so end user can view session playback |
| Reset User Password | Sent when a user requests a password reset |
| Send MFA | Sent when a Multi-Factor Authentication code is sent |
| User Invitation | Sent when inviting a user to the IrisCX Platform |
| Session Playback PIN | When session playback link is required playback pin is sent to a user |
| Expert Invitation | Sent when inviting an expert to the IrisCX Platform |
| Client Session Created | When a session is created, this template notifies the end user |
| Expert Session Created | When a session is created, this template notifies the expert |
| Session Data Processed | Notification for when all session data has been processed |
Step 1: Activating the Email Template in Your Workspace
- You can log in to your IrisCX Workspace as an administrator.
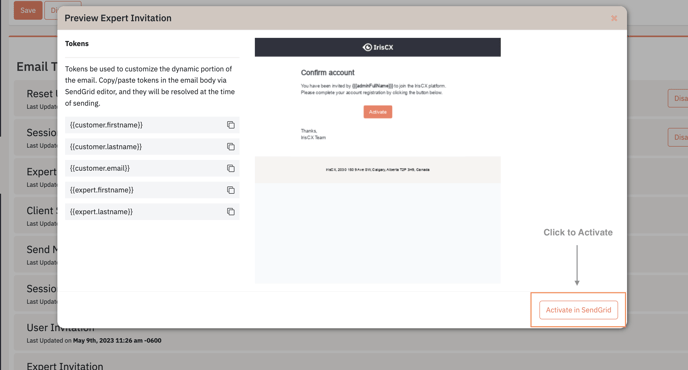
- Navigate to your "SendGrid Integration" and scroll down to view "Email Templates"
- Find the template you want to activate and click on the "Preview" button.
- This will open a modal allowing you to select "Active in SendGrid" in the bottom right corner
Once you activate the email template in your IrisCX Workspace, it will automatically appear in your SendGrid account.
Step 2: Customizing the Email Template in SendGrid
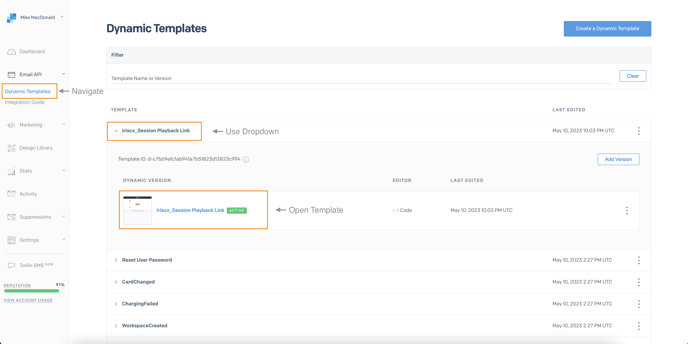
- Login to your SendGrid account.
- Click "Email API" in the sidebar and select "Dynamic Templates"
- Find your template with "Iriscx_" Prefix and open the template
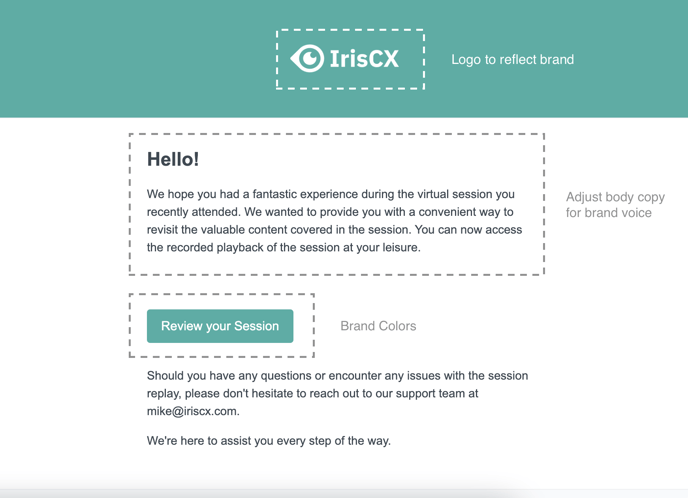
- Use the HTML editor to change:
- Copy for the body of the email
- Brand elements such as logo and banner color
- Button Color
- Click on "Save" when you're finished customizing the email.
In terms of what can be customized, the possibilities are nearly endless, but we suggest sticking to copy, brand and logo.
Conclusion:
By integrating your SendGrid account with IrisCX Workspace, you can customize the copy and layout of your Built-In automated email templates. Now you have complete control over the email communication experience for your clients, customers, and team members. '
The steps outlined in this article make it easy to integrate your SendGrid account with IrisCX Workspace and customize your email templates to fit your brand's messaging and tone. By taking advantage of this feature, you can ensure your email communications are clear, compelling, and on-brand.