Note: Before proceeding, ensure that Self-Guided Intake is part of your subscription plan. If you need help, contact your Customer Success Manager for assistance. Your success is our priority!
Jump to:
- Step 1: Enabling Self-Guided Intake in Workspace
- Step 2: Configure Self-Guided Customer SMS Greeting
- Step 3: Create a Self-Guided Flow (Guides)
- Step 4: Add Guide to Configurations
- Step 5: Launch
- Step 6: Review Session
Step 1: Enabling Self-Guided Intake in Workspace
Note: Only workspace admins are able to set up and configure this feature
You must enable this feature in your workspace before creating and benefiting from Self-Guided Intake in IrisCX. Here's how to get started:
-
Navigate to your IrisCX workspace
-
Find your general settings in your navigation panel
-
Click the toggle button to enable self-guided intake in workspace

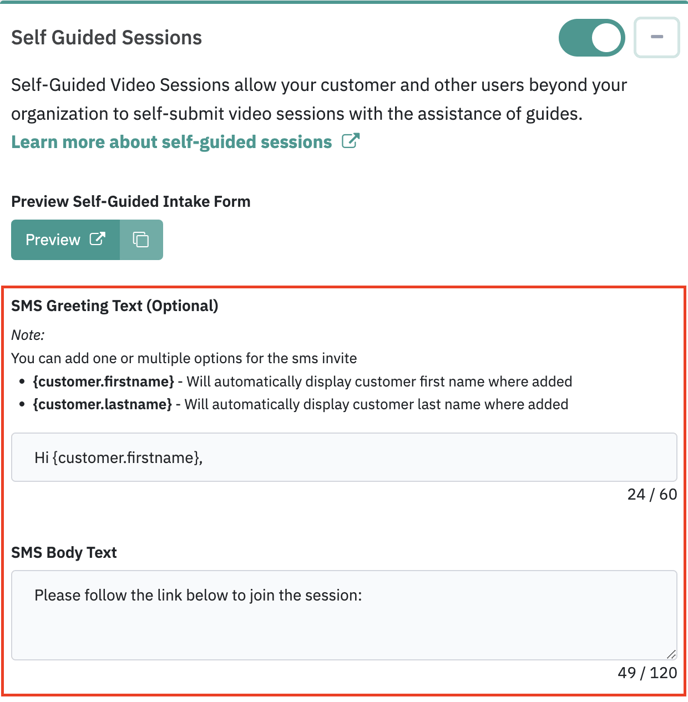
Step 2: Configure Self-Guided Customer SMS Greeting
Now that we have this feature enabled, there are a few configurations that we suggest working through. Here's how to get started:
-
Expand your configuration dropdown and navigate to SMS greeting & body inputs
-
Here, you can control the SMS invite message to your customer to complete their self-guided intake.
-
Note: To add a personalized approach, include customer name token.
-
Step 3: Create a Self-Guided Flow (Guides)
In the next step, we'll need to make sure you have created a guide for Self-Guided Intake. Here is how to get started:
1. Navigate to and expand your Guides configuration dropdown

2. From this dropdown, click “Create Guide,” which will create a new guide from scratch, OR click to edit an existing guide you wish to enable as a self-guided flow. This will open our edit guide popup.
3. Once we open the guide editor, we want to Toggle on “Self Guided Flow” option to open up additional settings:
-
Add a “Self-guided Display” name that will display to your customer when completing the intake form.
-
Add a Description to let your customers know exactly what this guide is for.
-
Optional: Add description field and placeholder text if you want to collect additional information from your customers.
-
Complete and save guide


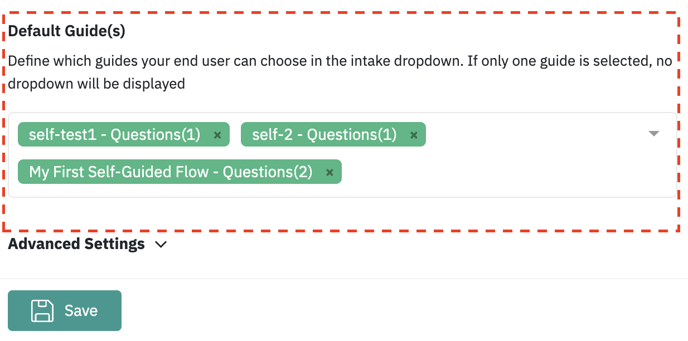
Step 4: Add Guide to Configurations
Next, we will ensure that our newly added self-guided flow is set up to show in your customer's intake form. Here is how to get started:
Note: you can add multiple self-guided flows to your self-guided intake form. By giving your customer multiple options, you can ensure that your customer and the guide they follow is focused on their needs. However, too many options may be confusing. Aim to have less than 5 options
-
Navigate to and expand your Self-guided configuration dropdown.
-
Next, use the “Default guides” dropdown to define which self-guided flows you want to show up in your customer's intake.
-
Note: Only guides enabled as self-guided flow will show up here
-
-
Click Save
Step 5: Launch
You now have all the pieces in place to launch your self-guided intake.
-
Use the “Preview” in your Self-Guided configuration dropdown to review your self-guided intake and ensure everything looks good.
-
Once everything is looking good, copy your Intake URL and paste it anywhere you want your customers to access it!

Step 6: Review Session
All completed self-guided intake submissions are accessed in your sessions tab upon completion.