Overview
Iris introduces expanded Single Sign-On (SSO) support within the app, enabling users to authenticate through a wide variety of identity providers securely. With SSO, users can log in using their credentials from trusted providers, simplifying access management and improving security. Supported providers include both SAML-based authentication and popular social login providers.
Supported SSO Providers:
-
SAML Provider
Social Providers (OAuth 2.0-based):
-
Microsoft
-
LinkedIn
-
Facebook
-
Google
-
Apple
-
GC Apple
-
Play Games (Google)
-
Twitter
-
Yahoo
These providers can be individually enabled, configured, and disabled in the Iriscx's settings. They will appear on the login and registration pages, offering users a variety of ways to authenticate
Setup Instructions
1. Access the SSO Settings
To configure SSO in Iriscx, please follow the steps below:
-
Log in to the workspace with an Admin role.
-
Navigate to the Settings> General page
-
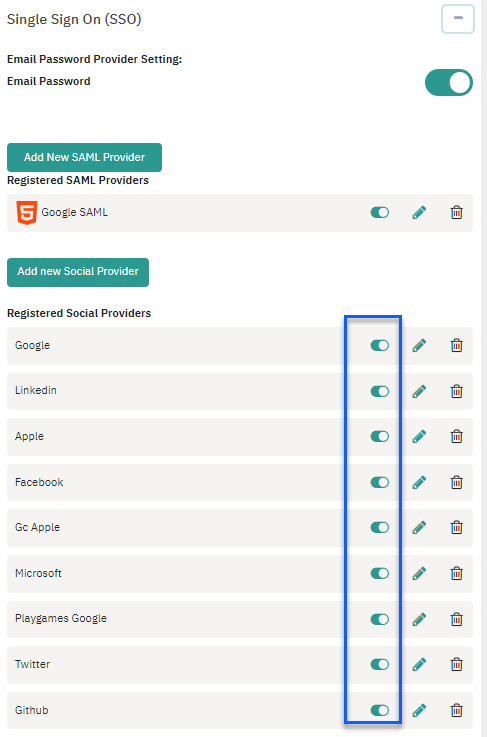
Go to the Single Sign on (SSO) section and expand it
The SSO settings page will display all available providers that can be configured for your workspace.
2. Configuring an SSO Provider
Each SSO provider requires specific configuration details to integrate with Iriscx. Here’s how to configure an individual provider:
Steps to configure:
-
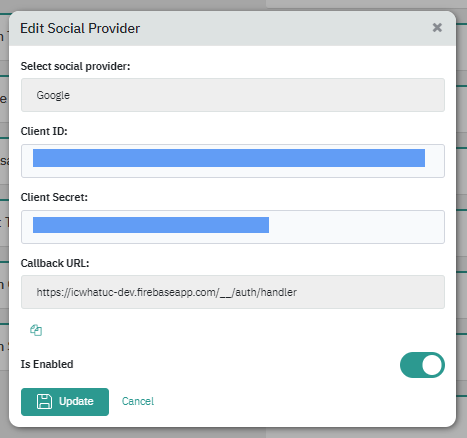
Select the SSO Provider: Click on the 'Add new social Provider' button and select the social provider that you want to configure (e.g., Google, SAML, Microsoft).
-
Enter the required credentials for the selected provider, which typically include:
-
Client ID: Provided by the SSO provider when you create an app with them.
-
Client Secret: This is a secure token that should be kept confidential.
-
Callback URL (Redirect URI): The URL where the SSO provider will redirect users after authentication. This URL is generated by the app and must be copied and set in the provider’s app configuration.
-
Example for Google SSO Configuration:
Go to the Google Cloud Console.
Create a new project or select an existing one.
Navigate to OAuth consent screen, configure the app name, and set up user permissions.
In Credentials, create an OAuth 2.0 Client ID and enter the app’s callback URL as the authorized redirect URI.
Copy the Client ID and Client Secret into the app's SSO settings.
-
Save the settings once you have entered the necessary information.
-
Enable or Disable the provider using the toggle switch next to its name. When enabled, the provider will appear on the login and registration pages.
Supported Provider Setup Instructions:
-
SAML Providers: Requires metadata XML file or specific configuration details such as Entity ID, ACS URL, and SAML certificate.
-
Microsoft/LinkedIn/Twitter: Requires OAuth 2.0 app registration from the respective developer portals.
-
Apple & GC Apple: Requires setup through Apple’s developer platform, including private key and Team ID.
-
Play Games (Google): Requires OAuth setup through Google Play Console.
3. Enabling and Disabling Providers
After successfully configuring a provider, you can enable or disable it using the toggle switch next to each provider. Disabling a provider will prevent users from logging in through that method, but the configuration will be preserved for future use.
Note: Disabling an SSO provider does not delete the associated configuration data. You can re-enable it at any time without needing to reconfigure it.
Login and Registration
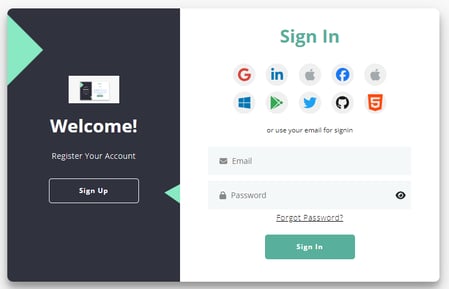
Once an SSO provider is enabled, it will automatically appear as an authentication option on both the login and account creation pages.
Login Page (/login)
-
When users access the
/loginpage, they will see the available SSO options displayed prominently beneath the standard username/password fields. -
Users can select their preferred SSO provider, which will redirect them to the external authentication service for login.
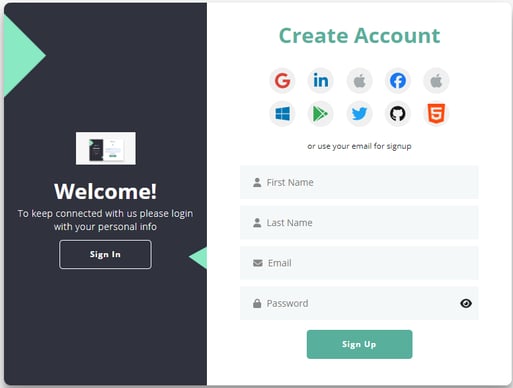
Create Account Page(/register)
- when new users registering for an account can also use SSO to create their profile. On the Create Account page, the same SSO options will be displayed, allowing users to streamline their registration process by using existing credentials from an external provider.
SSO workflow
See below how SSO works
-
The user selects an SSO provider (e.g., Google) on the login or registration page.
-
The user is redirected to the SSO provider's login page.
-
The user enters their credentials and authenticates with the provider.
-
Upon successful authentication, the SSO provider redirects the user back to the app with a secure authentication token.
-
The app verifies the token and grants access to the user.