NOTE: AVAILABLE FOR ADMIN AND MANAGER USERS
Leverage the power of automation to make life easier, whether it's before, during, or after your session. With automation, you can achieve a variety of different outcomes including creating custom alerts and notifications based on a set of events (e.g. when a customer joins a call), creating rules to auto-update session statuses and more. This article will give you an overview of the terminology used in our Automation Engine so that you can better understand what you can accomplish with this feature.
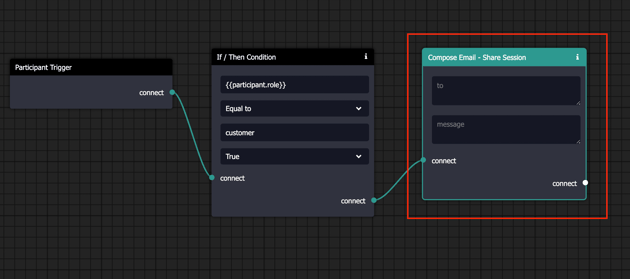
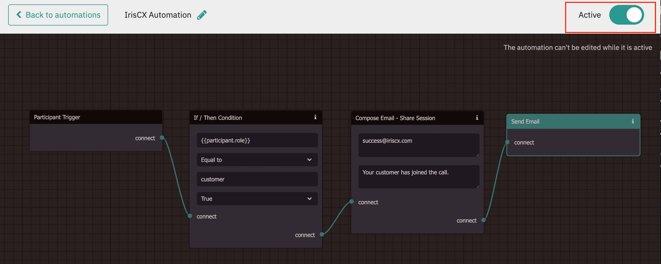
When set up, your automation will look something like the image below. Visit How to Create an Automation with IrisCX Workflow Automation Engine: A Step-by-Step Guide to learn more about setting up automation.
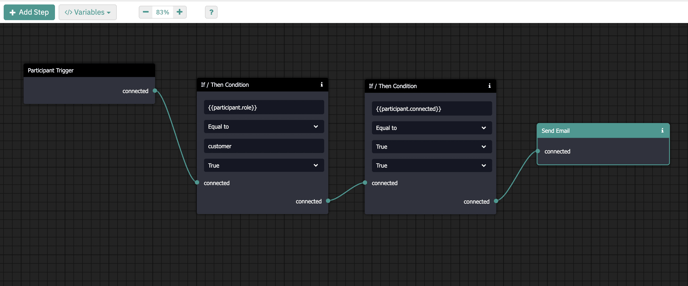
Table of Contents
- How can this help me?
- Key features of the Automation Engine
- Key Elements of Automation
- What are Trigger Steps?
What are End Steps?
Active vs. Inactive Automations
How can this benefit me?
-
Save time and increase efficiency by automating routine and repetitive tasks.
-
Reduce errors and ensure consistency by automating standard processes.
-
Free up time for more strategic work by eliminating manual processes.
-
Increase collaboration and communication by automating notifications and alerts.
Key Features of IrisCX Workflow Automation:
-
Easy-to-use, no-code automation: Create custom automation rules without any coding knowledge
-
Flexible automation options: Automate simple tasks to complex workflows
-
Powerful customization capabilities: Customize automation rules to fit your specific needs and requirements
What are the Key Elements of Automation Rules?
The process of automating tasks in IrisCX involves a set of components that work together seamlessly. These components, triggers, middle steps and end steps form the building blocks of automation. Combining these components allows you to create rules that perform various tasks. Triggers kick off the automation process, middle steps refine the rule, and end steps perform specific tasks.
Let's dive into each of these in a little more detail.
What Are Trigger Steps?
These are the steps that will kick off the automation process. You need to have a trigger to run automation, and you can only have one per automation.
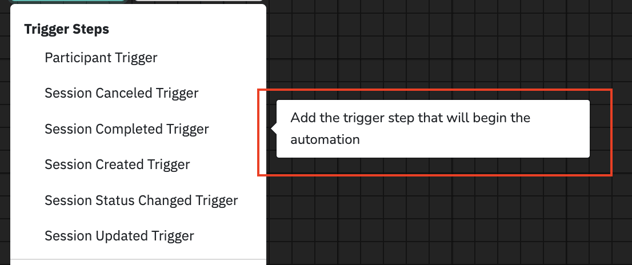
There are six types of triggers that you can use to kick off your automation: Participant Trigger, Session Canceled, Session Completed, Session Created, Session Status Changed and Session Updated.
Trigger: Participant Trigger
This trigger will kick off the automation process when a participant has joined the session.
Trigger: Session Cancelled
This trigger will kick off the automation process when a session has been cancelled.
Trigger: Session Completed
This trigger will kick off the automation process when a session has been completed.
Trigger: Session Created
This trigger will kick off the automation process when a new session has been created.
Trigger: Session Status Changed
This trigger will kick off the automation process when a session status has been changed.
Trigger: Session Updated
This trigger will kick off the automation process when a session has been updated. Examples of an 'update' include: a session being created, processed, cancelled, or deleted. It could also include a change to the session status, or an updated label.
What are the Middle Steps?
The middle steps in your automation help you define how and when your automation will continue.
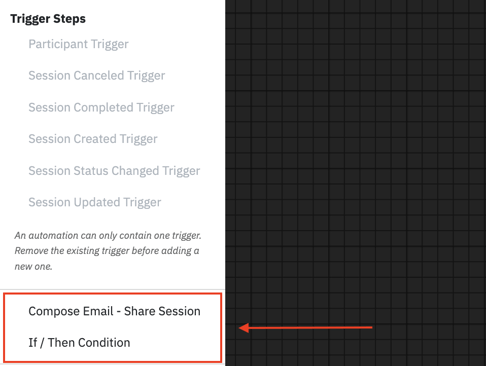
Middle Step: If/Then Condition
The 'If/Then condition' mechanism allows the automation to make decisions based on certain criteria being met. It essentially instructs the automation to execute specific actions if certain conditions are true, and potentially different actions if those conditions are not met.
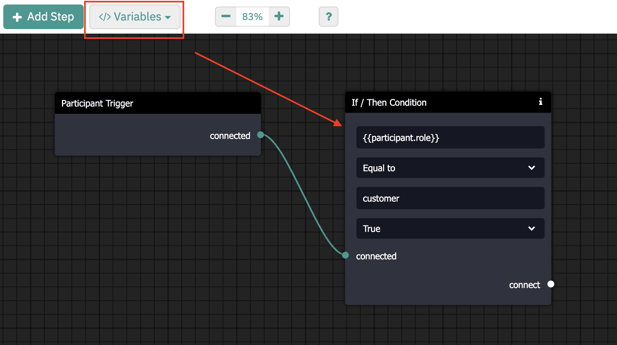
Choose the property that your conditional item should start with. You can choose from different "Variables" and paste them directly into the first box (Property A). Next, decide if the threshold should be equal to, greater than, or less than by using the dropdown under property A. Next, enter the value (or paste a variable) that corresponds to the previous step. You can set the step to fire when those parameters are true or false using the dropdown under property B.
Middle Step: Compose Email - Share Session
This step allows you to create an email with a custom message when sharing a session if it meets the specified parameters. You can enter more than one email address, separated by commas. For this step to run, you'll need to connect this to the end step called "Send Email".
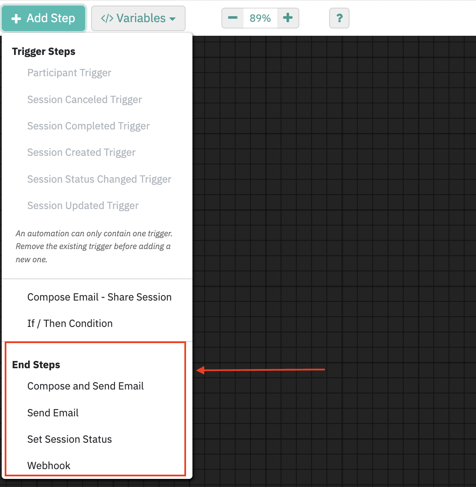
What are End Steps?
The end steps dictate what action will be taken to complete the automation. There are four options: Compose and Send Email, Send email, Set Session Status, and Webhook.
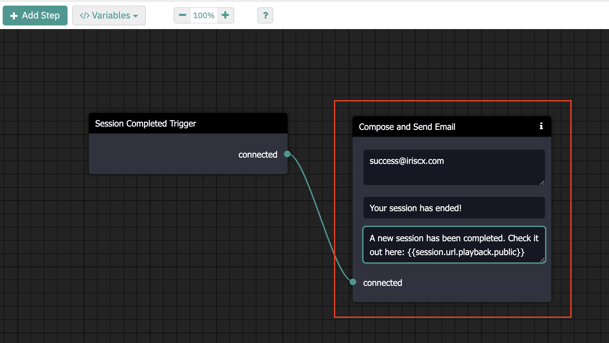
End Step: Compose and Send Email
This end step combines two actions in one. It will allow you to compose a generic email with a subject and body that can be defined directly in the step. It will also send the email without requiring a final connection to the "Send Email" step.
End Step: Send Email
Use this end step to create an email notification if the parameters in the automation have been met. This follows the ‘compose email’ step mentioned earlier. There you can customize the message and define the recipient.

End Step: Set Session Status
Set Session Status allows you to set the status of the session that meets the parameters of the automation to Open, Under Review, Pending, or Resolved (or any custom statuses your workspace has set up).

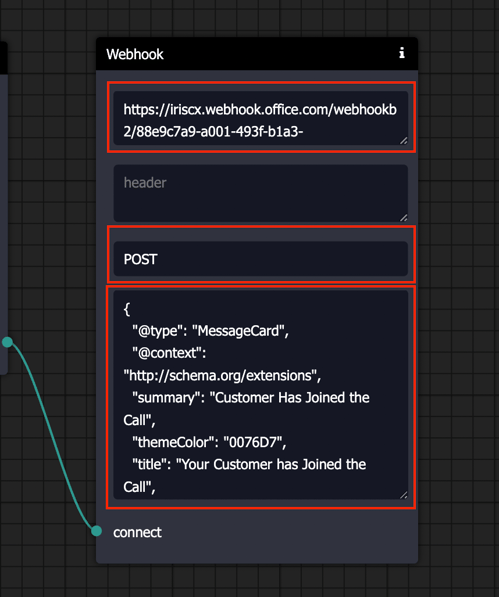
End Step: Webhook
This end step allows you to push a notification to a desired external channel (e.g. MS Teams, Slack, API) via a Webhook connector. A Webhook connector is a tool that enables external services to share content and updates within specific channels or conversations through a webhook URL.
Enter the Webhook URL in the section titled url. Then, enter the text POST in the http_verb section. Finally, enter the JSON/QUERYSTRING message in the section titled data.
Active vs Inactive States
Once you have created an automation, toggle the Active button on to activate your automation. An active automation means that this automation is currently live and running. To turn off or make an automation Inactive, you can click the toggle in the top right-hand corner to make it inactive.
Note: You will notice that when automation is active, you can not edit it. To make changes to your automation, you will first need to move the toggle to inactive.
Conclusion
There are a wide range of conditions that you can track using automation, and we recommend meeting with your Customer Success Manager to determine what would work best for your business goals.
Reach out to them directly or email support@iriscx.com.